

More to think about ...
FAQ & Print Guidelines
Print Friendly File Formats
We accept project files in a variety of formats.
FRIENDLY FOR OFFSET/DIGITAL HIGH END
- Adobe Acrobat PDF - Must be high-res PDF
- Adobe Illustrator (eps or ai)
- Quark Xpress (qxd)
- Microsoft Publisher (pub)
- Adobe Photoshop (psd)
FRIENDLY FOR DIGITAL COPY WORK
- Microsoft PowerPoint (ppt)
Certifications
A Few Guidelines to Produce High-Quality Files
-
Add crop marks to identify edges where the paper will be cut.
-
Make sure art is centered in the trim box.
-
Keep text and images that don't bleed positioned away from the edge of the final product. We recommend 1/8" inside the final product size on all four sides to ensure critical elements aren't affected if the paper shifts during production.
-
Provide CMYK files. All other color spaces (RGB, spot colors, etc.) will be converted to CMYK.
-
Use high-resolution art. We recommend all rasterized images be at least 300 dpi.
-
If your product folds, check our folding guides to be sure your artwork is set up properly.
-
If you're using a rich (or built) black, we recommend the following CMYK build: 75% cyan, 70% magenta, 40% yellow, and 100% black. This formula has been developed specifically for our presses and delivers optimal results. If you prefer a different build, keep total ink coverage below 300%.
-
Black at 100% is to be used for text, barcodes, QR codes, and indicias. The build for these items is 0% cyan, 0% magenta, 0% yellow, and 100% black. Do not use the rich black formula for text.
-
Be sure to make the size of your native file the flat size of your document.
-
Send instructions with your files if you need to communicate special information (like a CMYK build) or have an uncommon situation (like a custom layout). Although notes to prepress are typically not necessary if files have been created correctly, erring on the side of clarity can alleviate potential delays.
-
Don’t exceed 300% ink coverage, or it will saturate the stock and cause problems.
-
Print out your files to check all folds and die-cuts for proper image placement.
-
Design carefully so that folds don’t interrupt your message or visual effect and so that crossover images are handled skillfully. Don’t split type.
Your crop marks should match the finished size of the product you’re ordering. If a variation exists between your file’s crop marks and the finished size of the template, INDEXX will center your artwork based on the file’s crop marks.
Your product will be centered based on the trim box instead of the crop marks of the PDF. In most cases, crop marks and trim boxes are set to be the same. Trim boxes are helpful in interpreting the size of a custom order.
If your file contains unsuitable crop marks (e.g., ones that are manually “drawn” or rasterized), our system may fail to recognize the trim and orientation of your art. This discrepancy could result in a finished product that does not meet your expectations. Please contact a customer service rep if you need details about the guidelines.
If you’re uncertain how to define the page boxes when creating a PDF, or if your layout software does not support them, just ensure that your artwork is centered in your PDF page as mentioned above. In rare cases, an undefined trim box could result in the system failing to correctly recognize the orientation of the file, as indicated by the red trim box overlay on your proof. Please contact customer service if you have any questions.
PDF – art is centered based on the size of the product ordered and on crop marks
To find out what your trim box is, go to Acrobat, Preferences, General, and check the box labeled “show trim” [show screen capture]
Please have artwork oriented correctly in native files before outputting to PDF, or the rotations may not stay selected.
Photoshop will only let you have a trim box, not a bleed box. This trim box will always be the size of your Photoshop canvas.
If you rotate pages in a PDF file, the trim box will not rotate, which will change the orientation of your file when ordering a Fast Track proof. Rotations need to be “normalized” in Acrobat in order for them to take effect.
Resolution
All images used for printing should be a minimum of 300 DPI at the size used for layout.
PPI vs DPI
The first important point to understand about resolution is the difference between PPI (pixels per inch) and DPI (dots per inch). Many software programs and scanner interfaces use these two terms interchangeably but that's not exactly accurate. As a general rule, the term PPI should be used when referring to image resolution, and the term DPI should be used when referring to printing resolution.
How can you remember this? Monitors display pixels, and printers produce dots.
Printed images are composed of dots. Image resolution is simply the number of dots in a 1-inch grid.
There are two aspects to every image - its dimension (width and height in inches) and its resolution (the number of dots per inch). These two factors alone determine the total number of dots in an image. For example, a 2-inch by 3-inch image with a resolution of 300 dots per inch contains (2 x 300) x (3 x 300) or 540,000 dots.
The DPI of an image is determined when the image is captured. Let’s say you scan an image at 200 DPI into PhotoShop. Once in PhotoShop you increase it to 300 DPI. The image will print as if it were a 200 DPI image. All you have done is used 300 dots per inch to produce a 200 dots per inch image. You will need to recapture your image at 300 DPI or scale it accordingly.
Calculating Resolution
Calculate the resolution of your digital image and the maximum size you can go to retain a 300 DPI resolution as follows:
-
Determine the pixel dimensions from your digital camera
-
Divide those numbers by 300 (divide by 400 if the image contains text).
For example, an image without any text has a pixel dimension of 900 x 1200. When divided by 300, the maximum size of the image in your layout comes out to 3” x 4.” If you make the image any larger, it will not look sharp.
Web Images
You may be tempted to use a photo that you have lifted off of a favorite web site in your printing layout. Website images have a low resolution (72 DPI) and look terrible when printed on an offset press. Also, web images are in GIF or JPG format, so these images are sure to look disappointing in your final product. Check to make sure all images are at least 300 DPI and are legally available for use.
Proofing/Color Viewing
What you see is NOT what you get! Computer monitors display in RGB (Red, Green, Blue), while printed materials use process colors - CMYK (Cyan, Magenta, Yellow, Black). This means that your final printed product will look sharp and crisp, but the colors will look slightly DIFFERENT from those you see on your monitor.
If matching color is absolutely critical, be sure to request a Color Inkjet proof. All of our equipment is calibrated to a gray balance standard known as G7. So we have a high accuracy of producing it on our press.
Even our people are calibrated to G7!
Also know that we can convert your color from rgb to cmyk on the fly, but you can have full control of your color conversion by converting your print file before sending to us.
Color Basics
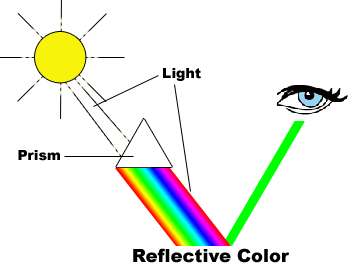
To understand how colors relate to printing, we should understand the difference between projected and reflective color.
Projected Color
Scanners and digital cameras create images using combinations of three colors: Red, Green and Blue (called “RGB”). These are the colors that computers and TVs use to display images on your screen.
This is color produced by light shining out or projected color. The problem is there is no way to do “real ink on paper” printing from a file that has colors created in RGB. They must be converted to CMYK. You can convert your RGB images using an image-editing application such as Photoshop, Corel PhotoPaint or another pixel-based editing application.
Reflective Color
When an image is printed on paper a color is produced by light hitting the paper and reflecting that color (spectrum).
In the printing industry four colors are used to produce all the colors in the rainbow: Cyan (blue), Magenta (red), Yellow and Black (K) (called “CMYK”). You must start with a CMYK image or convert your RGB image to CMYK in order to produce a printed product. You can convert your RGB images to CMYK using an image-editing application such as Photoshop, Corel PhotoPaint or another pixel-based editing application.
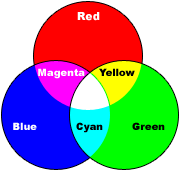
RGB Color Model
Additive color model for computer displays uses light to display color. Colors result from transmitted light: Red+Green+Blue=White
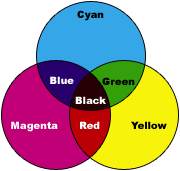
CMYK Color Model
Subtractive color model for printed material uses ink to display color. Colors result from reflected light:
Cyan+Magenta+Yellow=Black
RGB to CMYK Color Conversion
Files that have been created in RGB will need to be converted to CMYK because it is not possible to produce ink on paper printing from an RGB image. Files that were created in RGB and converted to CMYK will have a color shift. On some designs it is not very noticeable. On others the shift will stand out. During a color conversion all colors change from being built from 3 colors to being built from 4 colors. The colors are also changed from projected light to reflective light. Notice on the RGB color chart above that when all 3 colors come together the color white is produced. When all colors come together on the CMYK color chart the color black is produced. We prefer that our customers convert their RGB images to CMYK, therefore they have control over the final outcome.
Black Builds
Use caution when you have a solid area that is Black. Four-color process (CMYK) should be used to create a deep, dark, black, however if the total percentage of all four colors is greater than 340% your document will not print properly. Ink will saturate the stock and you will not be pleased with the final product. The only exception to this rule is text, you should use 100% black ink. We have developed settings that we know work well on our presses. Please use these settings when designing your document.
The optimum settings for Black are:
-
100% Black
-
75% Cyan
-
70% Magenta
-
40% Yellow
Black Text / Fonts:
When creating black type please use the following CMYK break down:
-
100% Black
-
0% Cyan
-
0% Magenta
-
0% Yellow

A Few Common Folds
Other
Have a question that's not addressed above? Give us a call and our Customer Service Reps will assist you.